
If you're using 3D mode, there are probably two things that annoy you the most. The first is the trees, because oh my god, and the second is countertop sinks being crazy flat and an unreadable mess in general. Before now, you couldn't even dream of cutting a sink into a counter - you'd have to make it ugly and flat like the automatically generated sinks, so that their bottom wouldn't be covered by the countertop. With the addition of two new rendering modes in version 71b: "DEPTH_MASK" and "DEPTH_MASK_PORTAL", these issues are things of the past.
How does it work?
Normally in 3D graphics, objects can be drawn in any order, because they test against a z buffer containing the depth of everything that has been drawn before, and simply skip pixels that would be occluded. However, this breaks down when alpha transparency is introduced - if something semitransparent is drawn before something behind it, the object behind it will be skipped entirely because the z test will fail, resulting in our semitransparent alpha cutting through that object. Conversely, if we drew everything that was meant to be behind the transparent object before drawing it, none of the z tests would fail and the semitransparent elements would correctly show all objects behind it. Because all objects in FreeSO can potentially have alpha transparancy, they need to be drawn in the correct order all the time. This is called "painter's algorithm" and is often used in video games to handle semi transparent elements.
Drawing everything in order gives us another benefit, though. Normally, we wouldn't be able to draw a sink cutting into a counter just by drawing the sink mesh, regardless of order. They would simply intersect as a mishmash of the two objects - The edges of the sink would draw on top of the counter, but everything that cuts into it wouldn't be visible - the countertop would be visible instead. This would just lead to a filled sink - not very functional.
Because we draw everything in the correct order (counter, then sink), we can do one better. By drawing the countertop first, we have the ability to clear its contribution to the z-buffer, allowing us to draw over it without any z tests failing. In layman's terms, we can paint the surface of the counter in such a way that we completely ignore it was there in the first place, allowing us to fill that space with whatever we want.
Setting this up in your Remesh with DEPTH_MASK
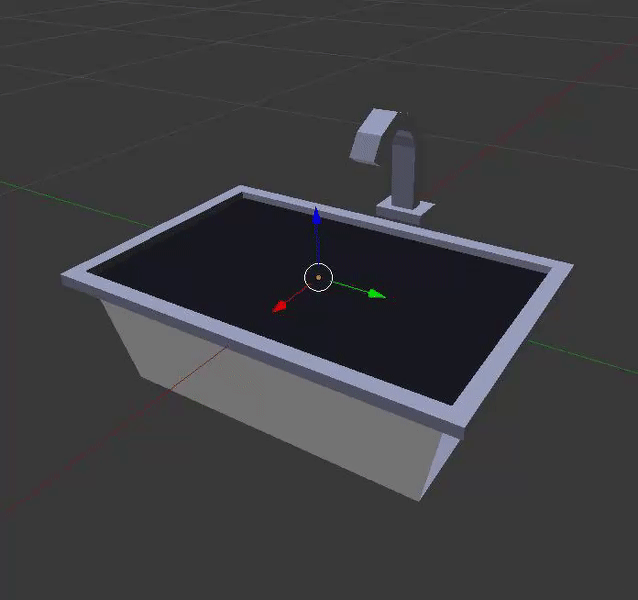
Mesh your object as normal, but with a good idea of where the surface you want to cut into should be. For countertop items, the surface should be at height 0, though your mask should be slightly above this.

Now we need to add the mask that will cut into the surface. Create a new object, ideally a plane, called "DEPTH_MASK". Make sure that it is slightly in front of the target surface (to avoid z fighting) and that the plane covers the exact (flat) area that cuts into the surface. This can be any shape you want, as long as it is flat and in front of the surface. You should make sure that your mesh ENTIRELY covers the mask... That is, there is no angle you could view your object from that would mask an area without filling each masked pixel with the real mesh. This can cause severe graphical issues, such as sims cutting through walls or objects in front of them.
Finally, enter Edit Mode on your mask, and press U to unwrap. Select any option. This must be done or the object will fail to import into Volcanic. This is more of a software limitation and will be fixed eventually.
The gif below shows a DEPTH_MASK object and an example sink. Note that the depth mask covers the entire area of the sink that will cut into the counter, but no more than that. It is also slightly above 0 so that it doesn't z fight with the countertop.
DEPTH_MASK_PORTAL and Non-Euclidean spaces
"But wait Rhys! If I try to use this to create a deep fireplace, people will see the mesh from the other side of the wall! Your solution sucks and the title is fake news."
Well, yes! That is why I've included a more advanced mode which literally allows you to break the rules of space and time to cut holes into things that have contents only visible from the front.
This works considerably differently from the above, as it requires you to manually segment the model into "normal" and "portal" parts. The normal parts (including dynamic sprites) are what appear in front of the cut, while the "portal" part is what appears behind it. The mask plane is largely the same, except it is called "DEPTH_MASK_PORTAL" and you should make sure its face normals are facing the correct way (the side you want the portal to be visible from).
Your portal part should be the final dynamic sprite in the object. This means, you should add one more dynamic sprite than the object uses, dedicated to drawing the portal region. You can see this in the image below, where everything behind our psuedo-window is placed in dynamic sprite 1 instead of the base image 0.
A good way of cutting the portal region out of a more complex mesh is using joining a copy of the surface plane to your main object, selecting all of its faces, then using "Mesh > Faces > Intersect (knife)". You can then delete the your duplicate mask, select all faces behind the portal and use "Mesh > Vertices > Separate" to split them into a different object.

There are a few limitations. Since only the final dynamic sprite is used for the portal, you cannot add dynamic sprites that will appear in portal space. Additionally, this is a lot more expensive than the other solution (4 more draw calls, more rasterizer state changes), and should only be used for objects that really need it (fireplaces). In most cases, the simple DEPTH_MASK is suitable.
How well does the illusion work?
The cut should be perfect from nearly all gameplay angles. There are some cases in which the ordering will break down, but these are usually with extreme cameras or unorderable combinations of objects (will only happen in extreme circumstances). The ordering was actually a lot worse before I started working on this - so you know this attempt has the "rhys's 2nd try" seal of approval, which means that it almost certainly works 99.8% of the time.
The main benefit of this is that we can make cuts that generalize to many objects, such as all counters, all walls, the floor... The only limit, is yourself.


(ball target mesh by @Mixa97sr)

How does it work?
Normally in 3D graphics, objects can be drawn in any order, because they test against a z buffer containing the depth of everything that has been drawn before, and simply skip pixels that would be occluded. However, this breaks down when alpha transparency is introduced - if something semitransparent is drawn before something behind it, the object behind it will be skipped entirely because the z test will fail, resulting in our semitransparent alpha cutting through that object. Conversely, if we drew everything that was meant to be behind the transparent object before drawing it, none of the z tests would fail and the semitransparent elements would correctly show all objects behind it. Because all objects in FreeSO can potentially have alpha transparancy, they need to be drawn in the correct order all the time. This is called "painter's algorithm" and is often used in video games to handle semi transparent elements.
Drawing everything in order gives us another benefit, though. Normally, we wouldn't be able to draw a sink cutting into a counter just by drawing the sink mesh, regardless of order. They would simply intersect as a mishmash of the two objects - The edges of the sink would draw on top of the counter, but everything that cuts into it wouldn't be visible - the countertop would be visible instead. This would just lead to a filled sink - not very functional.
Because we draw everything in the correct order (counter, then sink), we can do one better. By drawing the countertop first, we have the ability to clear its contribution to the z-buffer, allowing us to draw over it without any z tests failing. In layman's terms, we can paint the surface of the counter in such a way that we completely ignore it was there in the first place, allowing us to fill that space with whatever we want.
Setting this up in your Remesh with DEPTH_MASK
Mesh your object as normal, but with a good idea of where the surface you want to cut into should be. For countertop items, the surface should be at height 0, though your mask should be slightly above this.
Now we need to add the mask that will cut into the surface. Create a new object, ideally a plane, called "DEPTH_MASK". Make sure that it is slightly in front of the target surface (to avoid z fighting) and that the plane covers the exact (flat) area that cuts into the surface. This can be any shape you want, as long as it is flat and in front of the surface. You should make sure that your mesh ENTIRELY covers the mask... That is, there is no angle you could view your object from that would mask an area without filling each masked pixel with the real mesh. This can cause severe graphical issues, such as sims cutting through walls or objects in front of them.
Finally, enter Edit Mode on your mask, and press U to unwrap. Select any option. This must be done or the object will fail to import into Volcanic. This is more of a software limitation and will be fixed eventually.
The gif below shows a DEPTH_MASK object and an example sink. Note that the depth mask covers the entire area of the sink that will cut into the counter, but no more than that. It is also slightly above 0 so that it doesn't z fight with the countertop.
DEPTH_MASK_PORTAL and Non-Euclidean spaces
"But wait Rhys! If I try to use this to create a deep fireplace, people will see the mesh from the other side of the wall! Your solution sucks and the title is fake news."
Well, yes! That is why I've included a more advanced mode which literally allows you to break the rules of space and time to cut holes into things that have contents only visible from the front.
This works considerably differently from the above, as it requires you to manually segment the model into "normal" and "portal" parts. The normal parts (including dynamic sprites) are what appear in front of the cut, while the "portal" part is what appears behind it. The mask plane is largely the same, except it is called "DEPTH_MASK_PORTAL" and you should make sure its face normals are facing the correct way (the side you want the portal to be visible from).
Your portal part should be the final dynamic sprite in the object. This means, you should add one more dynamic sprite than the object uses, dedicated to drawing the portal region. You can see this in the image below, where everything behind our psuedo-window is placed in dynamic sprite 1 instead of the base image 0.
A good way of cutting the portal region out of a more complex mesh is using joining a copy of the surface plane to your main object, selecting all of its faces, then using "Mesh > Faces > Intersect (knife)". You can then delete the your duplicate mask, select all faces behind the portal and use "Mesh > Vertices > Separate" to split them into a different object.
There are a few limitations. Since only the final dynamic sprite is used for the portal, you cannot add dynamic sprites that will appear in portal space. Additionally, this is a lot more expensive than the other solution (4 more draw calls, more rasterizer state changes), and should only be used for objects that really need it (fireplaces). In most cases, the simple DEPTH_MASK is suitable.
How well does the illusion work?
The cut should be perfect from nearly all gameplay angles. There are some cases in which the ordering will break down, but these are usually with extreme cameras or unorderable combinations of objects (will only happen in extreme circumstances). The ordering was actually a lot worse before I started working on this - so you know this attempt has the "rhys's 2nd try" seal of approval, which means that it almost certainly works 99.8% of the time.
The main benefit of this is that we can make cuts that generalize to many objects, such as all counters, all walls, the floor... The only limit, is yourself.
(ball target mesh by @Mixa97sr)
Last edited: